Dodge Avenger: Jacking and tire changing
 Dodge Avenger: Jacking and tire changing
WARNING:
• Being under a jacked-up vehicle is dangerous. Thevehicle could slip off the jack and fall on you. Youcould be crushed. Never put any part of your bodyunder a vehicle that is on a jack. Never start or runthe engine while the vehicle is on a jack. If youneed to get under a raised vehicle, take it to aservice center where it can be raised on a lift.
• The jack is designed to use as a tool for changingtires only. The jack should not be used to lift thevehicle for service purposes. The vehicle shouldbe jacked on a firm, level surface only. Avoid ice orslippery areas.
Jack Location
The jack and jack-handle are stowed under the load floorin the trunk.
Spare Tire Stowage
The compact spare tire is stowed under the rear load floorin the trunk.
Spare Tire Removal
Lift up the load floor cover and remove the hold down.
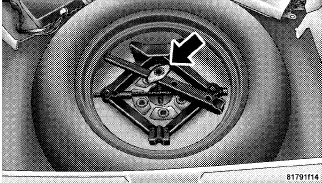
Spare Tire and Jack Stowage
Preparations For Jacking
1. Park the vehicle on a firm, level surface. Avoid ice orslippery areas.
WARNING:
Do not attempt to change a tire on the side of thevehicle close to moving traffic. Pull far enough offthe road to avoid the danger of being hit whenoperating the jack or changing the wheel.
2. Set the parking brake.
3. Place the shift lever into PARK (automatic transaxle)or REVERSE (manual transaxle).
4. Turn OFF the ignition.
5. Turn on the Hazard Warning flasher.
 6. Block both the front and rear of thewheel
diagonally opposite the jackingposition. For example, if changing theright front
tire, block the left rearwheel.
NOTE: Passengers should not remain in the vehiclewhile the vehicle is being jacked.
Jacking Instructions
WARNING:
Carefully follow these tire changing warnings tohelp prevent personal injury or damage to yourvehicle:
• Always park on a firm, level surface as far fromthe edge of the roadway as possible before raisingthe vehicle.
• Block the wheel diagonally opposite the wheel tobe raised.
• Set the parking brake firmly and set an automatictransmission in PARK; a manual transmission inREVERSE.
• Never start or run the engine with the vehicle on ajack.
• Do not let anyone sit in the vehicle when it is on ajack.
• Do not get under the vehicle when it is on a jack.
• Only use the jack in the positions indicated andfor lifting this vehicle during a tire change.
• If working on or near a roadway, be extremelycareful of motor traffic.
• To assure that spare tires, flat or inflated, aresecurely stowed, spares must be stowed with thevalve stem facing the ground.
• Turn on the Hazard Warning flasher.

Jack Warning Label
1. Remove the scissors jack and lug wrench from thespare wheel as an assembly. Turn the jack screw to the leftto loosen the lug wrench, and remove the wrench fromthe jack assembly.
NOTE: The jack handle attaches to the side of the jackwith two attachment points. When the jack is partiallyexpanded, the tension between the two attachmentpoints holds the jack handle in place.
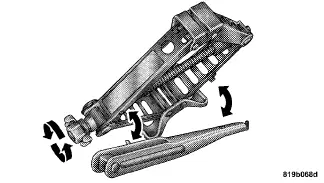
Removing Jack Handle From Jack
2. Loosen, but do not remove, the wheel nuts by turningthem to the left one turn while the wheel is still on theground.
CAUTION:
Do not attempt to raise the vehicle by jacking onlocations other than those indicated in Step 3.
3. There are two front jacking locations and two rearjacking locations on each side of the body (as picturedabove).
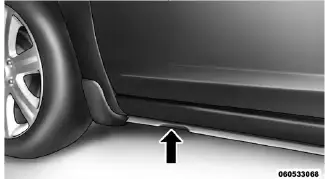
Front Jacking Location
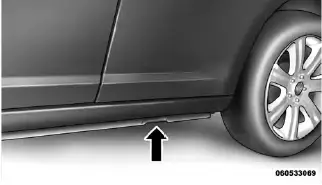
Rear Jacking Location
4. Turn the jack screw to the left until the jack can beplaced under the jacking location. Once the jack ispositioned, turn the jack screw to the right until the jackhead is properly engaged with the lift area closest to thewheel to be changed. Do not raise the vehicle until youare sure the jack is securely engaged.
WARNING:
Raising the vehicle higher than necessary can makethe vehicle less stable. It could slip off the jack andhurt someone near it. Raise the vehicle only enoughto remove the tire.
5. Raise the vehicle by turning the jack screw to the right,using the swivel wrench. Raise the vehicle only until thetire just clears the surface and enough clearance isobtained to install the spare tire. Minimum tire liftprovides maximum stability.
6. Remove the wheel nuts, and pull the wheel and wheelcovers (where applicable) off the hub. Install the sparewheel and wheel nuts with the cone shaped end of thenuts toward the wheel. Lightly tighten the nuts. To avoidthe risk of forcing the vehicle off the jack, do not tightenthe nuts fully until the vehicle has been lowered.
WARNING:
To avoid possible personal injury, handle the wheelcovers with care to avoid contact with any sharpedges.
7. Lower the vehicle by turning the jack screw to the left.
8. Finish tightening the nuts. Push down on the wrenchwhile tightening the wheel nuts. Alternate nuts, untileach nut has been tightened twice. The correct wheel nuttorque is 100 ft lbs (135 N·m). If you doubt that you havetightened the nuts correctly, have them checked with atorque wrench by your authorized dealer or at a servicestation.
9. Remove the wheel blocks and lower the jack until it isfree. Reassemble the lug wrench to the jack assembly andstow it in the spare tire area. Secure the assembly usingthe means provided.
WARNING:
A loose tire or jack thrown forward in a collision orhard stop could endanger the occupants of the vehicle.
Always stow the jack parts and the spare tire inthe places provided.
10. Place the deflated (flat) tire in the cargo area and havethe tire repaired or replaced as soon as possible.
WARNING:
A loose tire thrown forward in a collision or hardstop could injure the occupants in the vehicle. Havethe deflated (flat) tire repaired or replaced immediately.
11. Check the tire pressure as soon as possible. Correctthe tire pressure as required.


